Hello, everyone.
Thank you for buying this asset.
This page will provide a brief explanation of how to use this asset here.
When thinking about settings for different development environments and considering the specifications of the PCs that customers will use in Unreal Engine 5, I often ponder various issues.
For instance, I wonder, 'It works in my development environment, but how will it perform on lower-spec systems?' UserSettings-related problems always seem to persist. For example, not being able to discern the differences between UserSettings before and after changes, or making abrupt changes that cause the PC to become unresponsive and sluggish.
That's when I had an idea: what if you could make changes while observing their impact? I pondered this and created an asset that is as user-friendly as possible and considers the environment – and that's where 'SpinBoxSettings' comes into play.
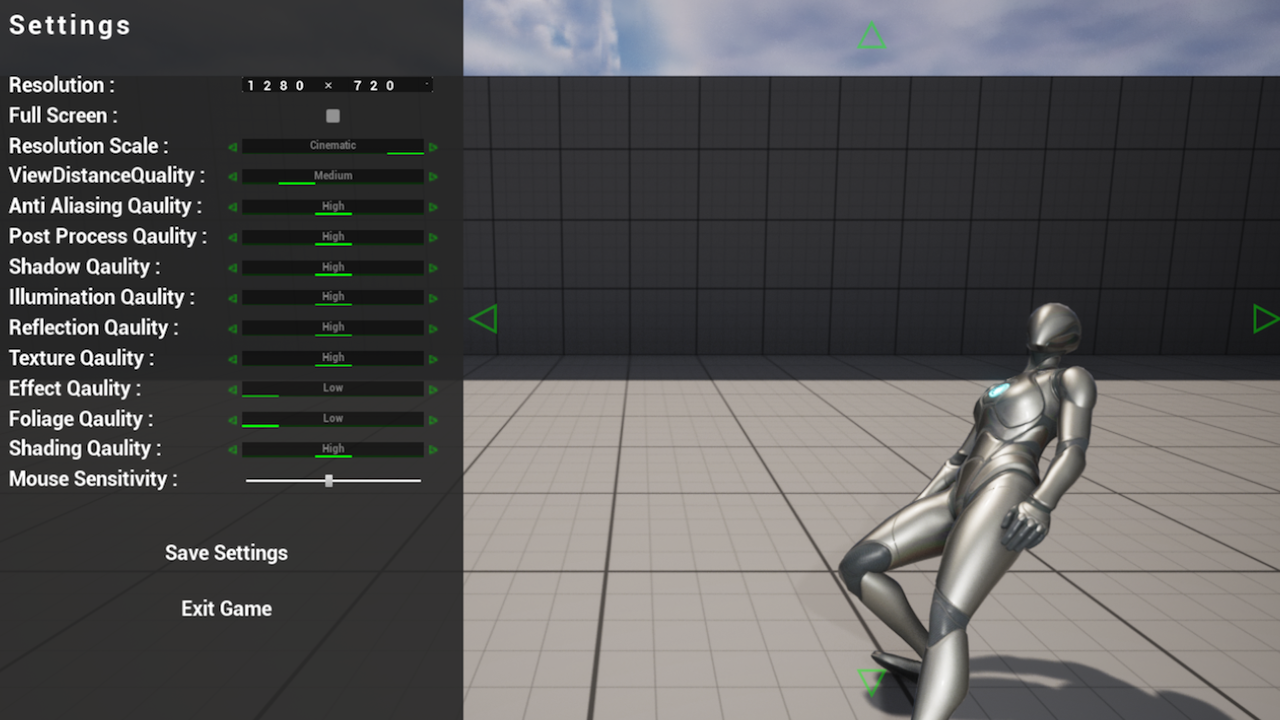
This asset allows you to adjust settings while previewing them when you are configuring User Settings. With this, you can develop while fine-tuning your development environment and shader load.
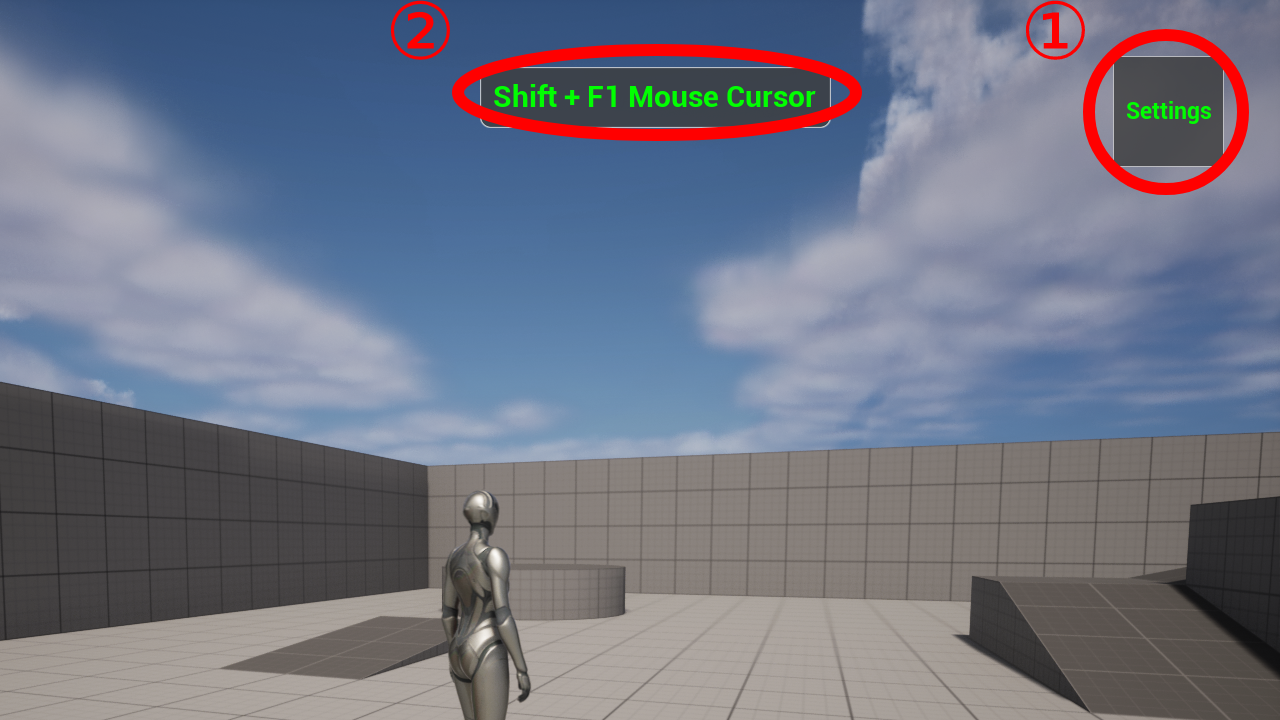
The user interface consists mainly of just two elements.
① Settings
You can open user settings with this button.
②Mouse Capture Status
This status automatically detects the mouse capture state.
It is displayed for your convenience only during the initial startup.
Therefore, if you find out that you can release mouse capture with 'Shift + F1', you can remove it.
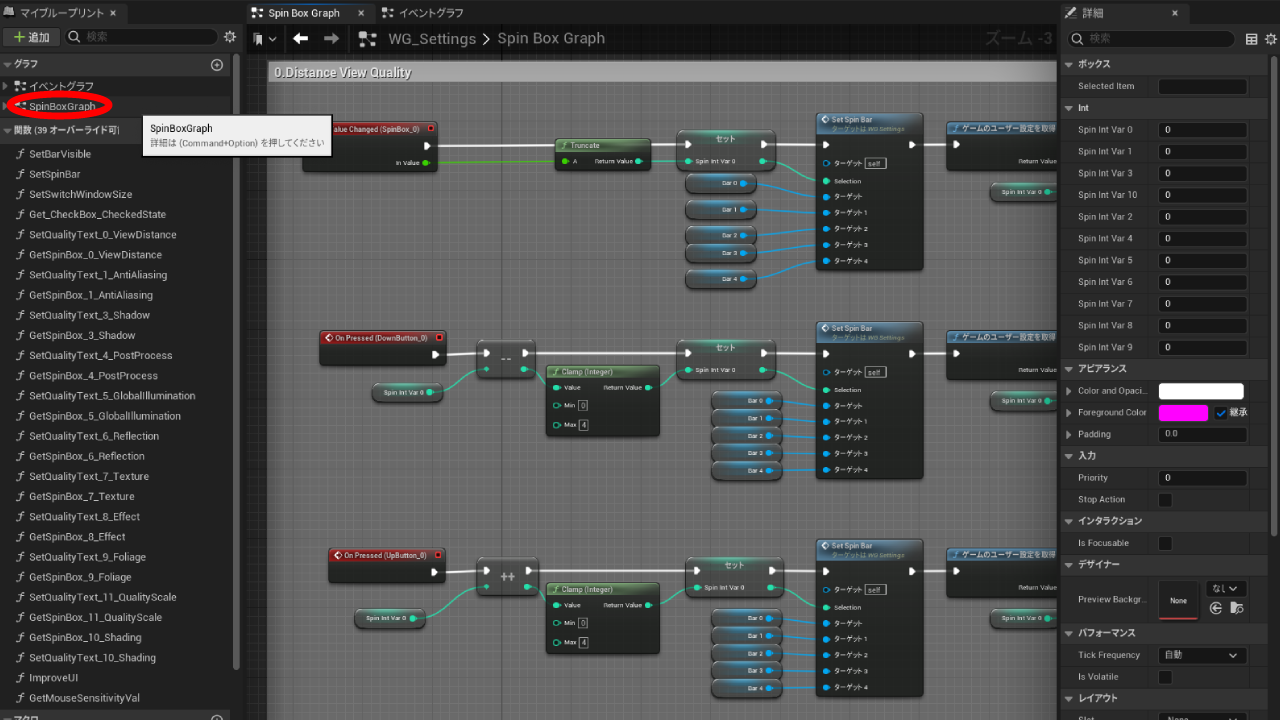
Internal Explanation of UserSettings
Contents - SpinBoxSettings - Please open the WG_Settings widget.
When you want to add additional options, it is recommended to add items to the Vertical Box inside the Designer's hierarchy.
Also, inside the SpinBoxGraph in the graph, you will find the main SpinBox nodes, so if you want to add custom items, setting up nodes in a similar way may be a good idea.
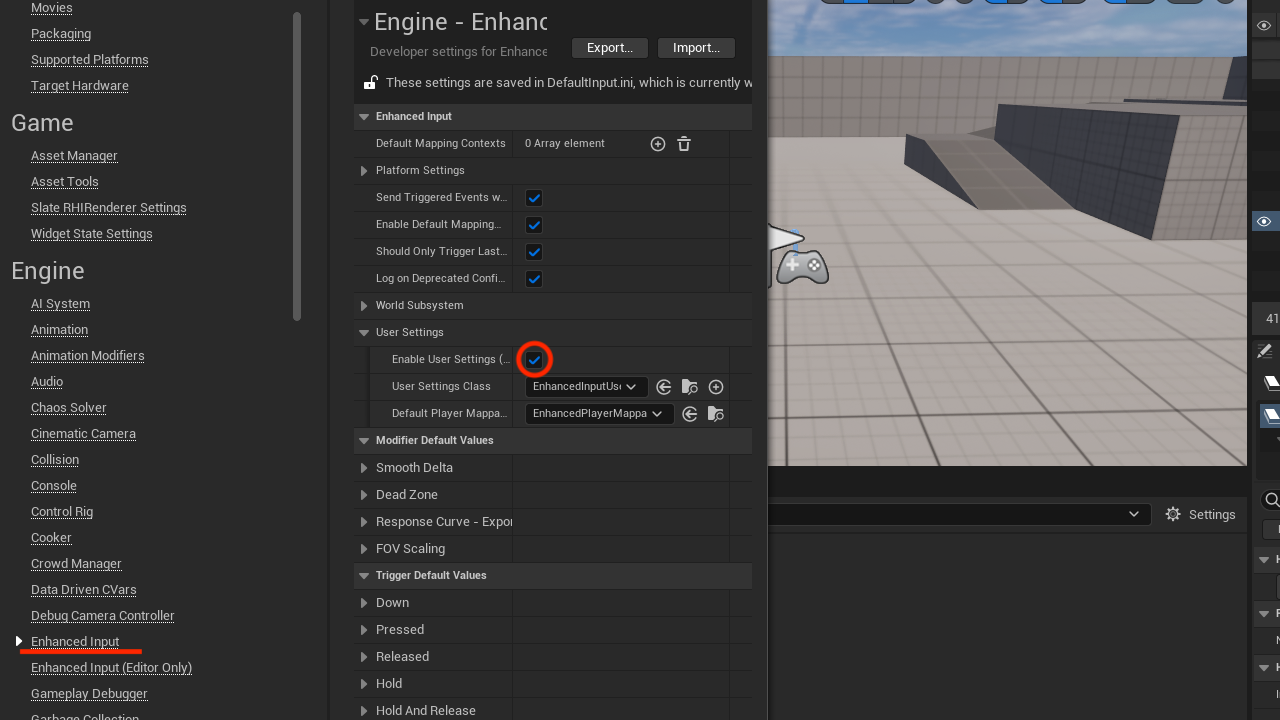
ーFirst, please check this settingー
Use this setting if you encounter errors like 'Blueprint Runtime Error: "Accessed None trying to read property CallFunc_GetUserSettings_ReturnValue".' when launching the asset demo.
Depending on the version, this setting may or may not be necessary.
It's hard to say definitively because it depends on your development environment, but it seems to occur more frequently in relatively newer versions.
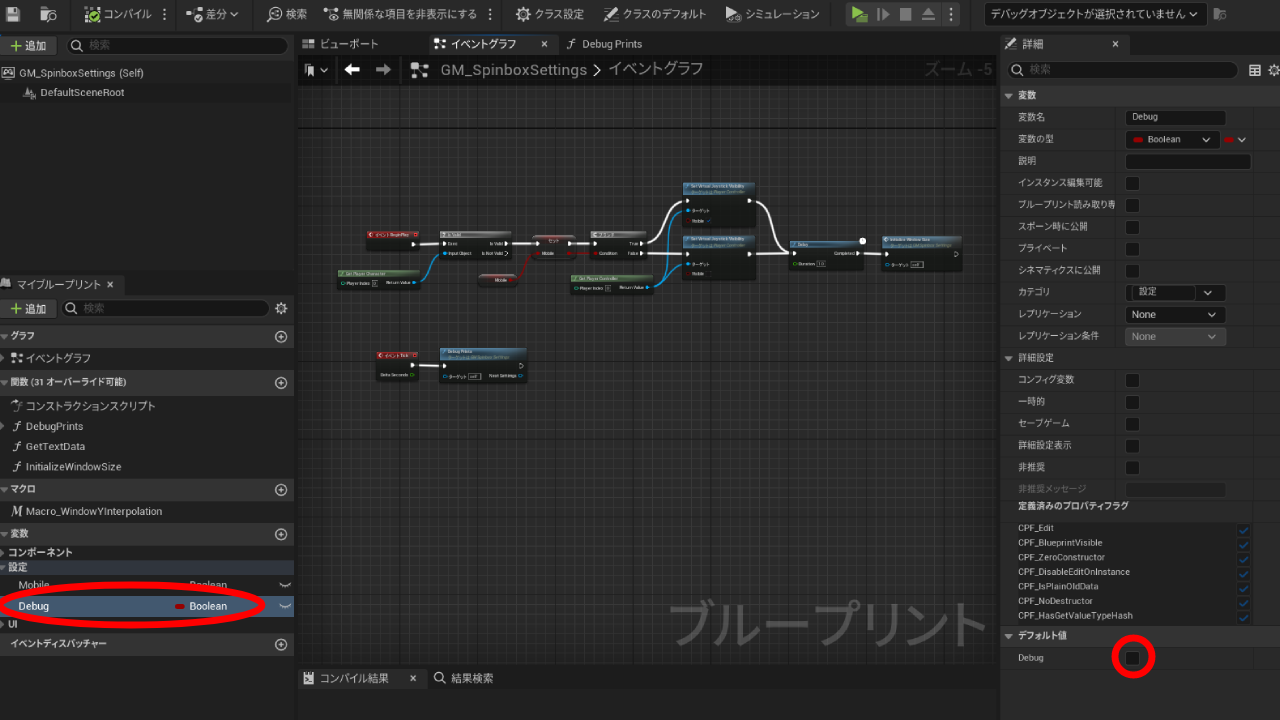
Contents - SpinBoxSettings - Blueprints - Please open the GM_SpinboxSettings.
If you set the default value of Debug in Variable - Settings - Debug to True,
you can check the current user settings with debug messages in the top left corner.
You may find it useful if needed.
'SetCameraMode'
This adjusts the camera to focus on the player when Previewer becomes True. It returns to its original state when you set Previewer to False.
It is primarily set to False in the Construction Script.
'Macro_UIMouseSensitivity'
This is connected to the addControllerInput function in EnhancedActionEvent for adjusting Mouse Sensitivity.
'Macro_UISettingsBranch'
This is a macro that branches based on whether the UserSettings widget is displayed or not.
'PointLight'
This is spawned to prevent the character from getting dark when Camera Previewer becomes True.
It gets destroyed when it becomes False.
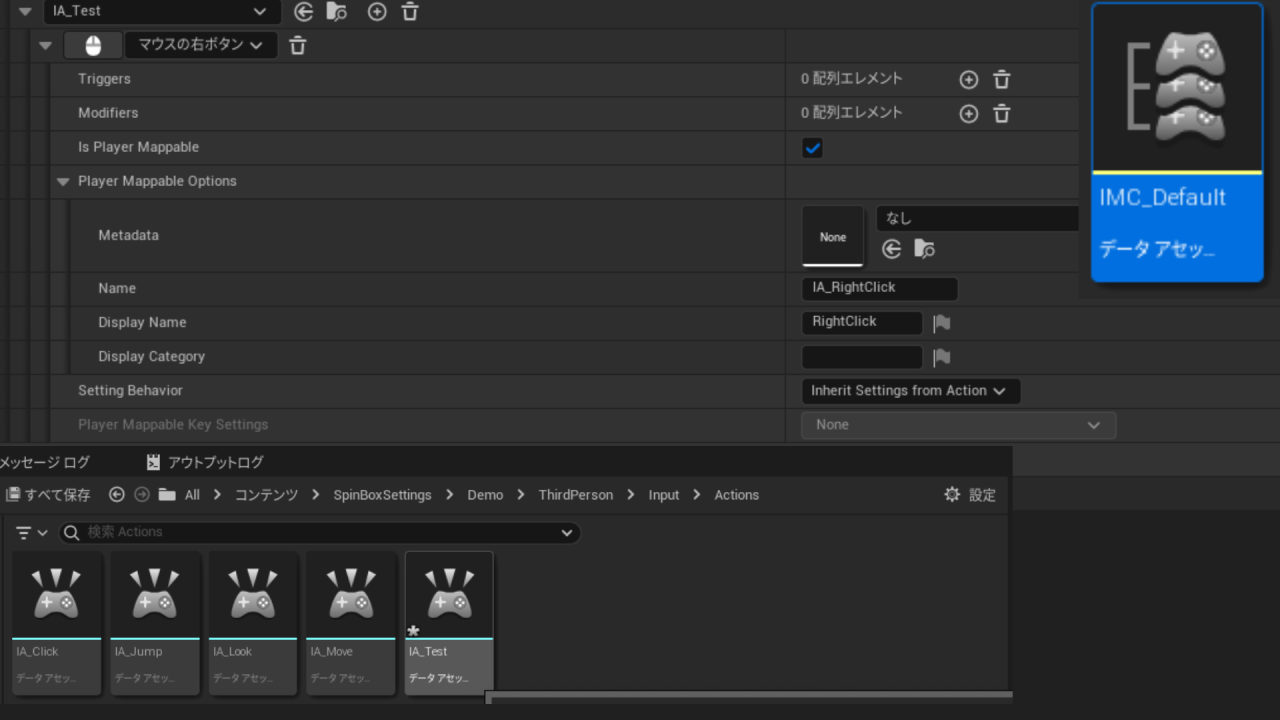
'IA_click'
I created an input for left click in the input action.
During the setting operation, you can rotate and inspect the mesh from the right half of the viewport.
This operation can be performed by long-pressing and dragging the left mouse button. It automatically returns when closed with 'SaveSettings'.
Here, we will explain the addition of new key bindings using Enhanced Input.
First, follow the usual procedure to write Enhanced Input in BP_ThirdPersonCharacter. Please refer to the official documentation at here for details.
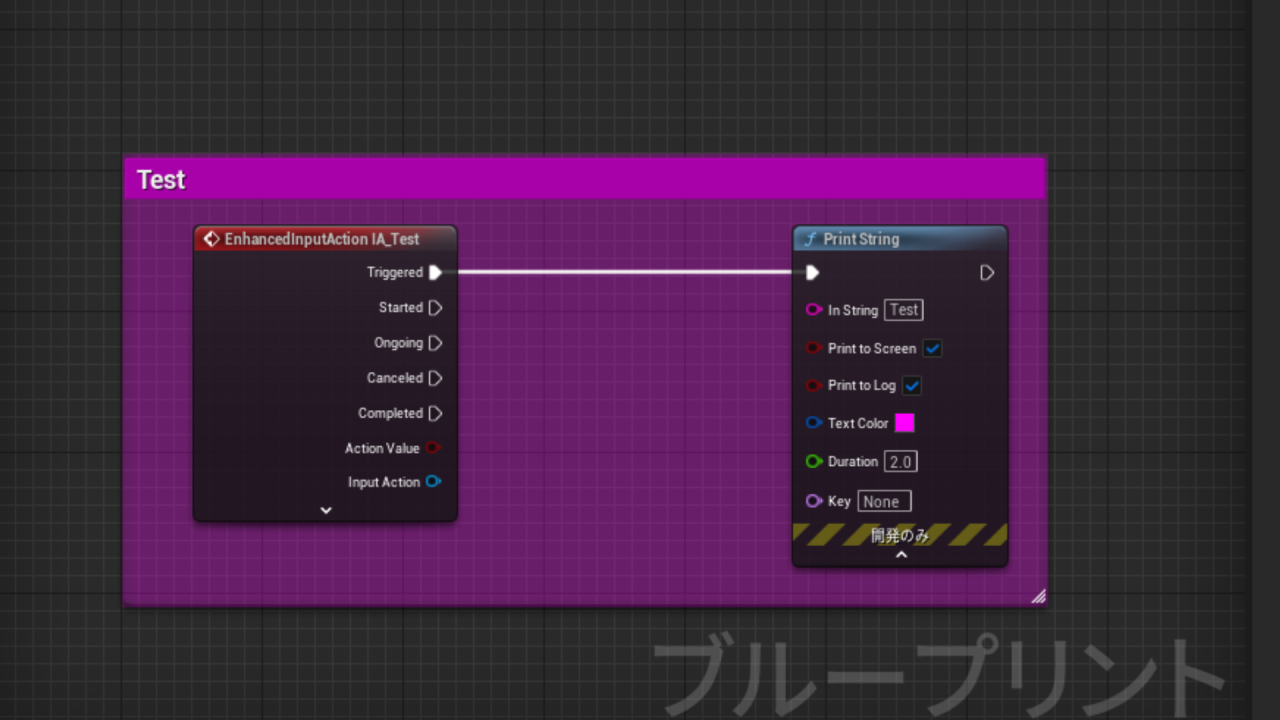
For example, please create a node that displays 'Test' in PrintString when right-clicked, as shown in the following image.
*The key binding functionality in Unreal Engine 5.3 and later is now saved in user settings.
Therefore, the processing for the borders below is no longer necessary.
The mechanism of nodes in versions 5.2 and 5.3 has been changed.
Please differentiate the processing based on the version you are using.
Additionally, the structure of the SpinboxSettings asset has also been changed in versions 5.2 and 5.3.
Be sure to install the asset version that matches your intended version.
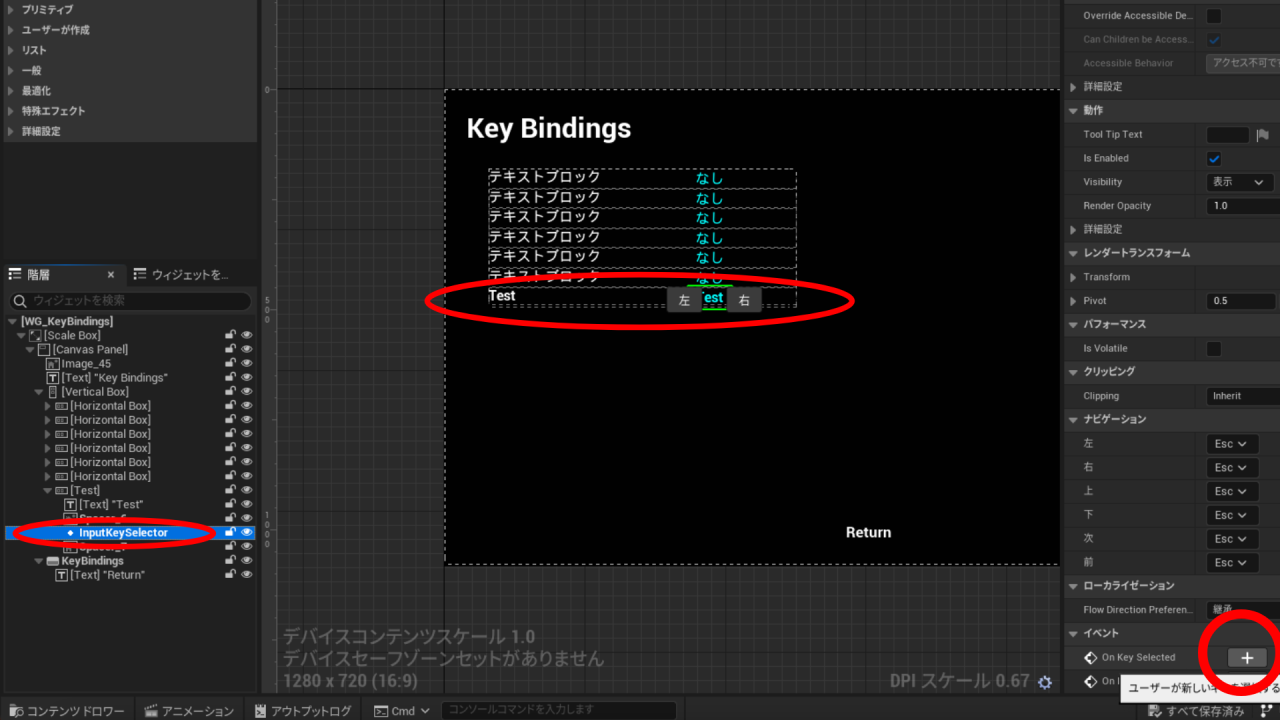
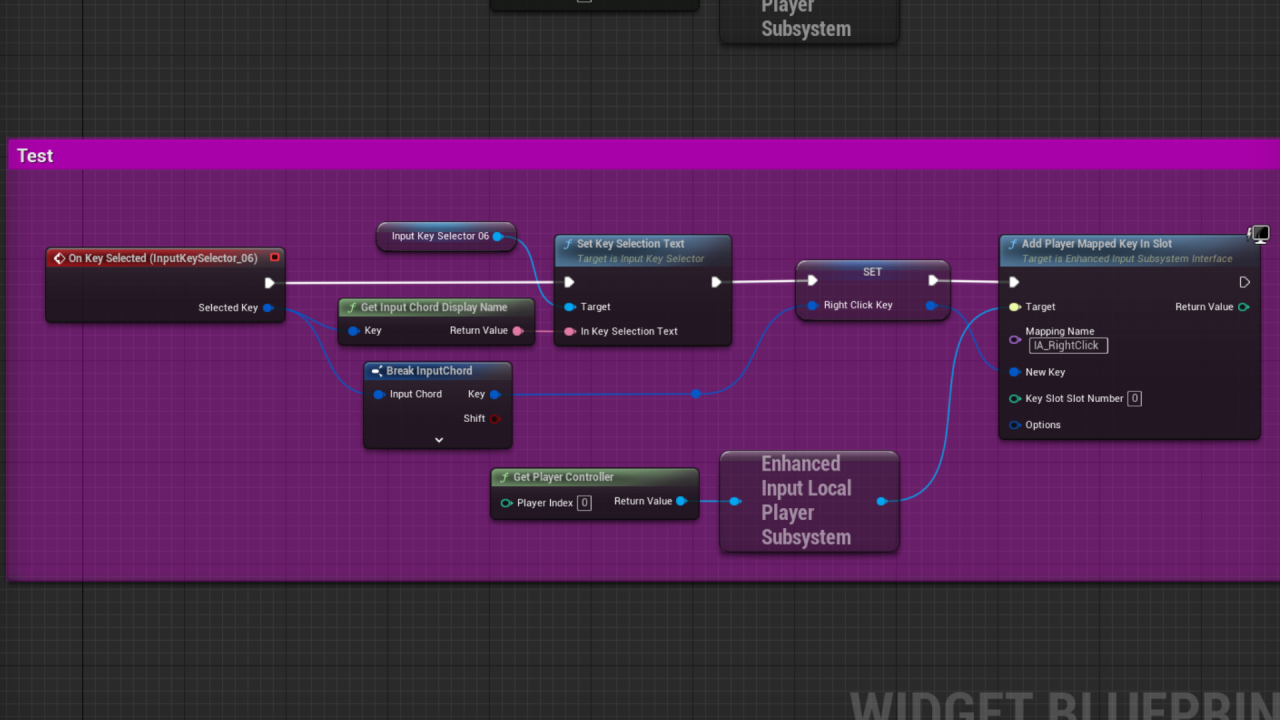
Please assemble nodes as shown in the diagram below, or similar to other key selectors.
This process alone allows you to change the supported keyboard layout temporarily,
but it reverts to the default after the game session ends.
Therefore, next, you need to save the modified keyboard data once.
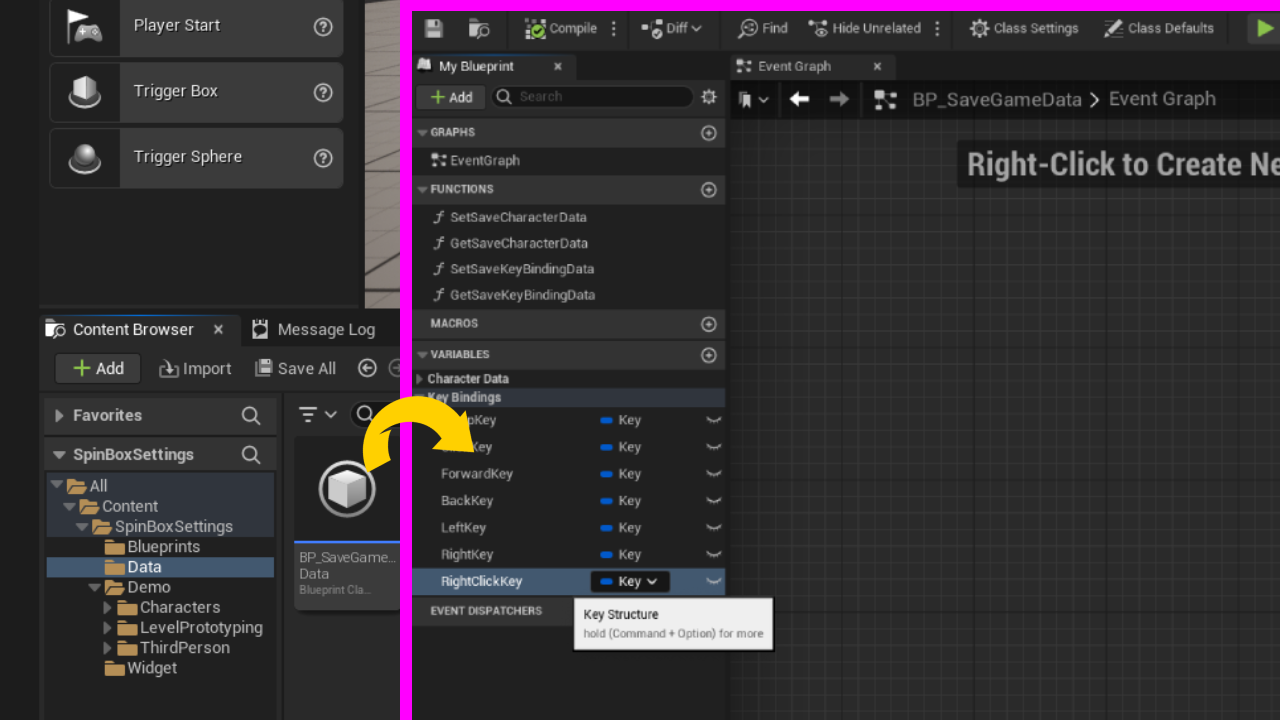
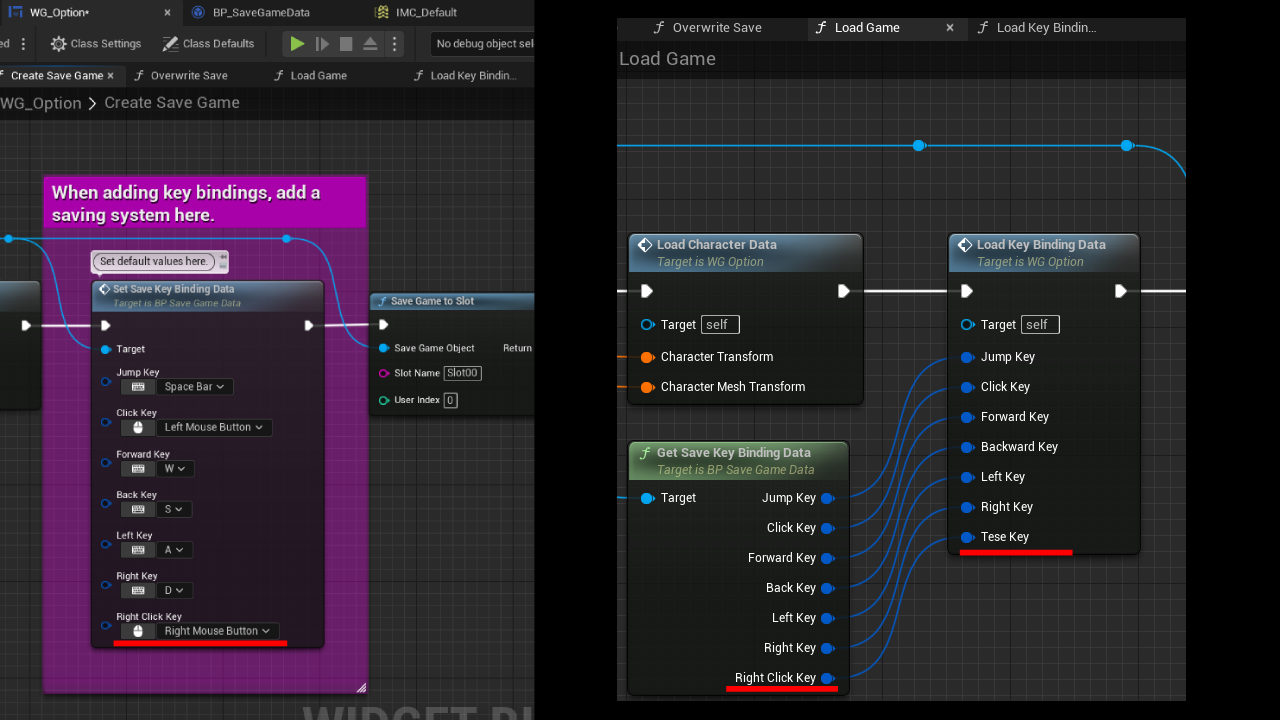
Open 'BP_SaveGameData' inside the 'Data' folder and create a variable with the type 'Key'.
For this example, the name of this variable has been set to 'RightClickKey'.
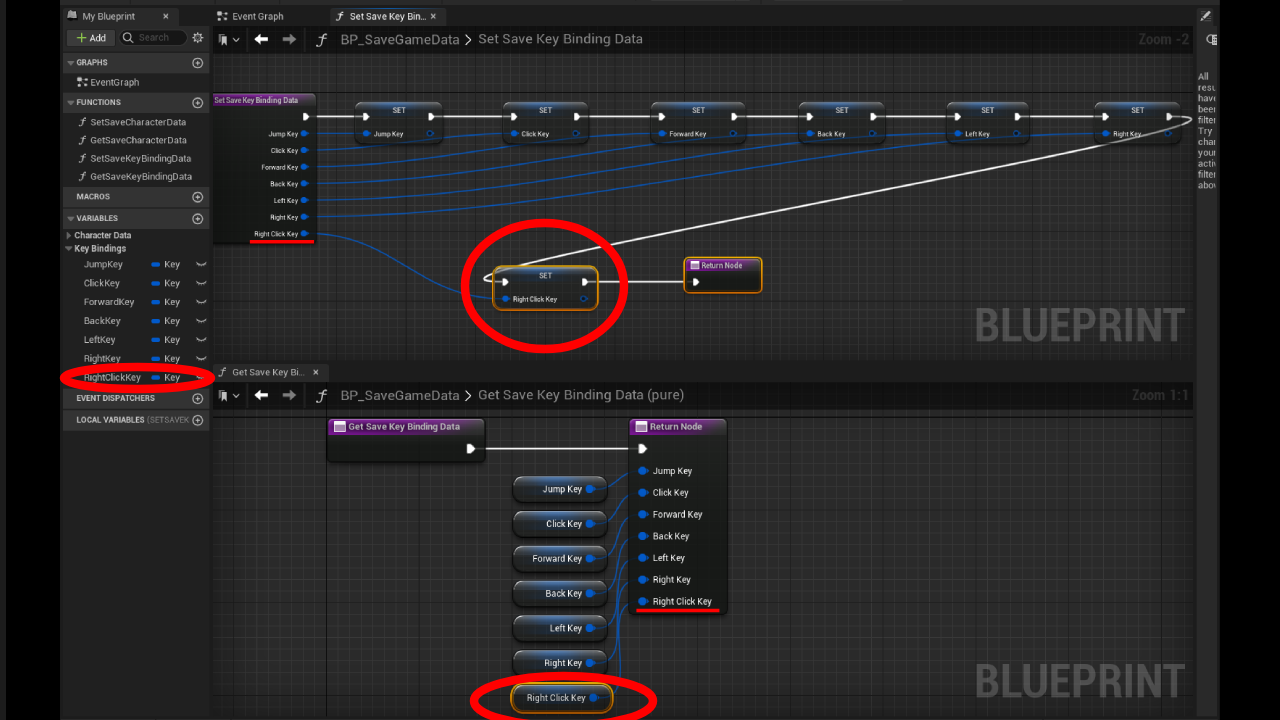
Next, open the functions 'SetSaveKeyBindingData' and 'GetSaveKeyBindingData'.
Integrate 'RightClickKey' as shown in the following diagram.
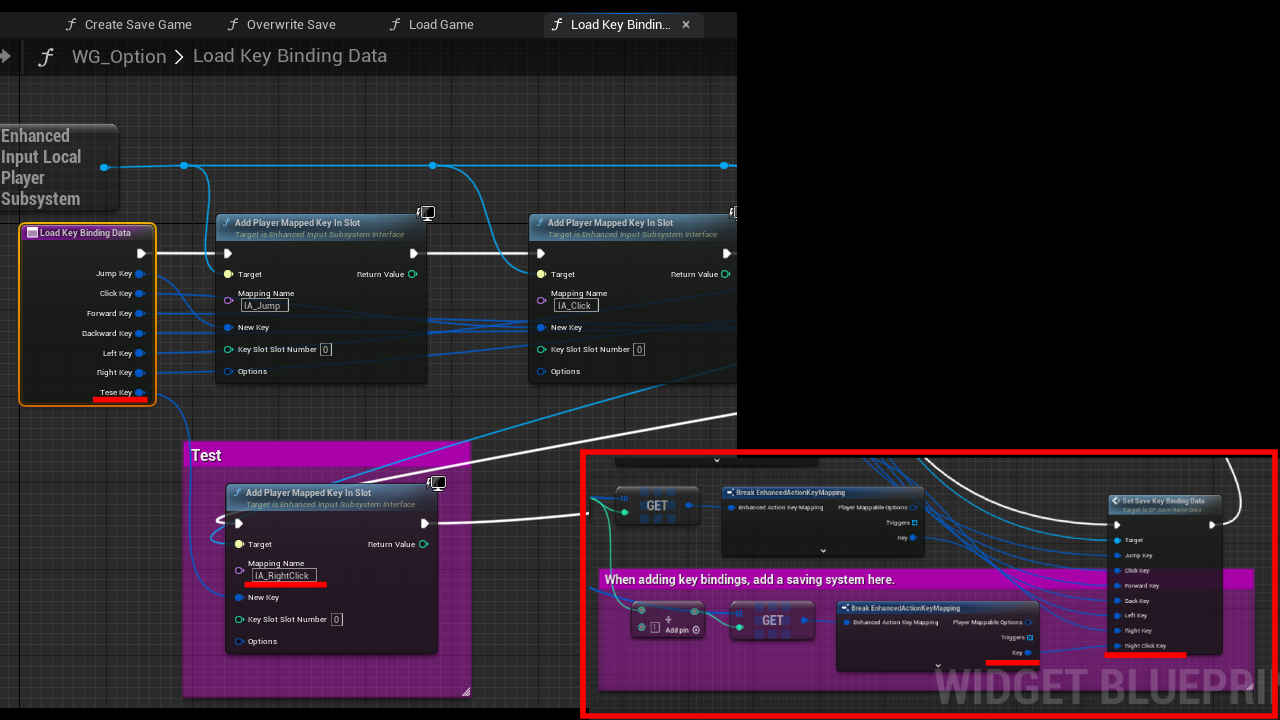
Open 'WG_Option' in the Widget folder.
Connect functions 'CreateSaveGame,' 'LoadKeyBindingData,' and 'OverwriteSave' in 'WG_Option' as shown in the image.
Then connect the pin from 'LoadGame.'
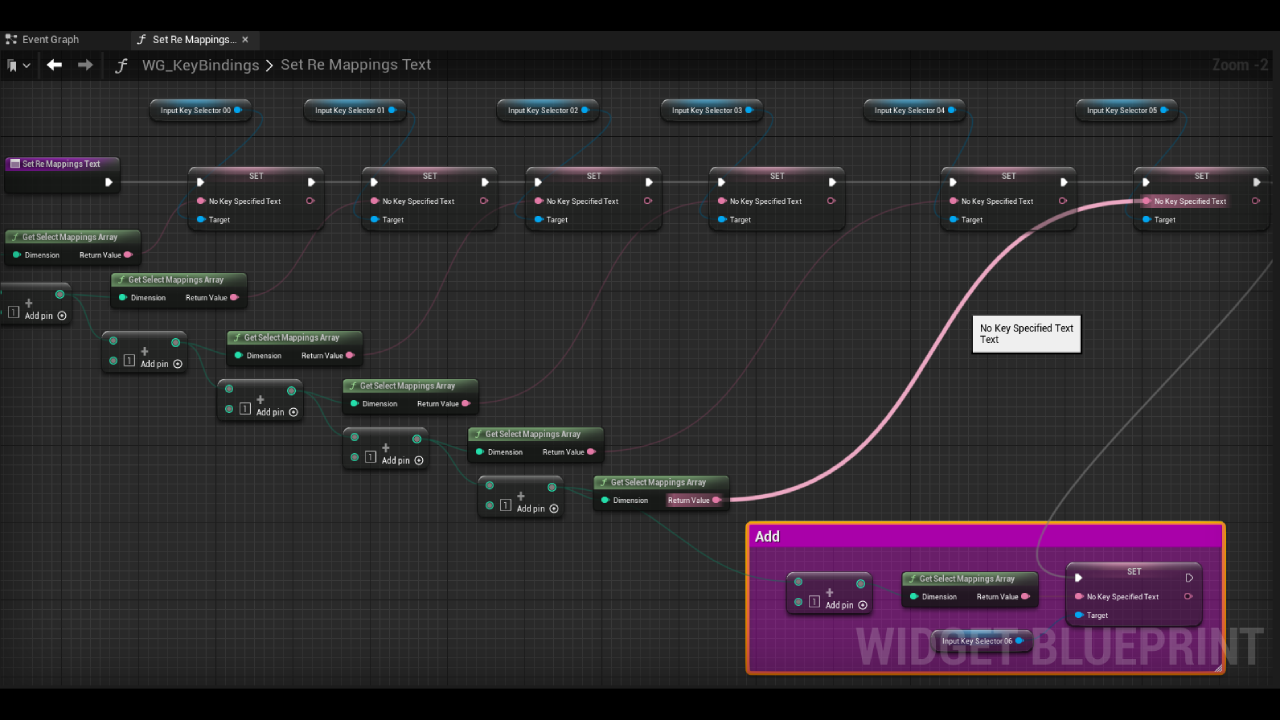
Open 'WG_KeyBindings' in the Widget folder.
Open the function named 'SetReMappingsText.'
Then, assemble the nodes as shown in the image.
With this, the settings will be saved even when the window is closed.
This asset includes a simple save system.
It is separate from the keyboard you have set in the key bindings.
It has been set up for your immediate use, for now.
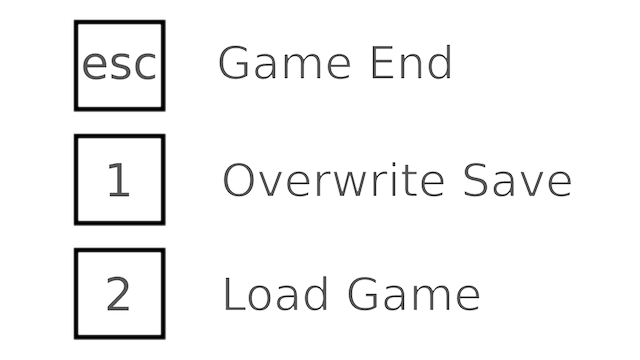
The keyboard settings are in the image below.
In the initial setup,
pressing 'Save Settings' in the 'WG_Settings' widget returns you to the game and saves the settings.
Similarly, when you press the 'Exit Game' button, it also saves the settings.
As for 'Load', settings are not configured for keys other than the 2 key on the keyboard.
However, there's a variable called 'Auto Load' in 'WG_Option'.
If you want to autoload at the start of the game, set this to True.
It's inputted from 'Event Construct' in 'WG_Option'.
Also, a save data is created from 'WG_Option' Event Construct only during the game's first launch.
If you don't need this during development, you might consider deleting it.
Alternatively, you could manually incorporate it into the third key on the keyboard,
giving you the option to handle it manually.